Résumer cet article avec :
 Claude
Nobody fancies opening their fridge to a whiff of something funky, do they? We get it – from forgotten leftovers to mysterious odours that seem to linger no matter what you do, a smelly fridge can make your kitchen feel less than fresh. At Wecasa, we believe in keeping things natural and effective, which is why we’ve gathered the best eco-friendly methods to banish those unwanted pongs for good.

What causes a fridge to smell bad?
Most fridge odours come down to a few common culprits that are easier to spot than you might think. Here’s what’s usually behind those unwanted smells:
Food-related causes:
- Spoiled or expired food hiding in corners or behind other items
- Spills and leaks from containers that haven’t been cleaned up properly
- Strong-smelling foods like fish or cheese stored without proper sealing
Appliance issues:
- Dirty drip pan collecting moisture and bacteria underneath your fridge
- Blocked drainage causing stagnant water to build up
- Contaminated water filters in fridges with dispensers
The good news? Once you know what you’re dealing with, tackling these issues becomes much more straightforward.
Clean your fridge thoroughly: step-by-step
Remove everything and check for spoiled food
Start by emptying your refrigerator completely – yes, everything needs to come out. This gives you proper access and prevents missing any hidden culprits lurking behind condiment bottles, you can also defrost your fridge, but that is not necessary.
Check each item systematically using this approach:
- Visual inspection: Look for mould, discoloration, or unusual textures
- Smell test: Trust your nose – if it smells off, bin it
- Date check: Examine use-by dates, especially on dairy and meat products
Common spoilage indicators:
| Food Type | Warning Signs |
|---|---|
| Dairy | Sour smell, curdling, mould spots |
| Meat/Fish | Grey colour, slimy texture, strong odour |
| Vegetables | Soft spots, wilting, dark patches |
| Leftovers | Off smell, visible mould, separation |
Don’t forget to check removable parts like drawers and shelves for any spills or sticky residue that might be contributing to the smell.
Wipe down all surfaces with natural cleaners
Now comes the satisfying bit – giving your fridge a proper clean with natural solutions that won’t leave chemical residues near your food.
Top cleaning solutions:
| Natural Cleaner | Mixing Ratio | Best For |
|---|---|---|
| Baking soda solution | 1 tbsp per litre warm water | General cleaning, odour removal |
| Vinegar mix | 1:1 with water | Disinfecting, stubborn smells |
| Lemon juice blend | 1:2 with water | Fresh scent, antibacterial action |
Work systematically from top to bottom using a soft cloth. Pay special attention to corners where spills collect and drawer runners where sticky residue builds up. Rinse your cloth frequently and finish by drying all surfaces with a clean towel to prevent water spots.
These natural deodorizers work brilliantly without the harsh chemicals – perfect for keeping your food fresh and your fridge hygienic.
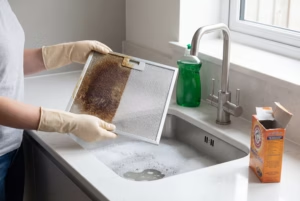
Don’t forget the drip pan and door seals
These often-overlooked spots can be the real culprits behind persistent fridge odours. The drip pan sits at the bottom of the fridge, collecting moisture that creates perfect conditions for bacteria growth.
Cleaning your drip pan:
- Locate the panel at the front bottom of your fridge (check your manual if needed)
- Carefully slide out the pan and wash with warm water and dish soap
- For stubborn odours, add baking soda to neutralise smells
- Dry thoroughly before replacing
Door seal maintenance:
- Mix 1 tablespoon baking soda with 1 quart warm water
- Wipe down the rubber seals, getting into all the folds where food particles hide
- Use an old toothbrush for tricky corners
- Rinse and dry completely to prevent mould growth
Clean these areas every few months to keep cold air sealed in properly and nasty smells out.
Natural remedies to remove bad odours
Baking soda: the classic odour absorber
This humble kitchen staple works wonders by neutralising acidic molecules that create those unpleasant fridge smells. Place an open container filled with baking soda on a middle shelf where air circulation is best – people often make the mistake of tucking it away in corners.
Placement tips:
- Use a shallow bowl rather than keeping it in the box for maximum surface area
- Position near the source of strongest odours
- Replace every three months when it becomes less effective
For stubborn smells, spread baking soda on a plate and leave for few hours before wiping surfaces with the same powder mixed into a paste. This helpful tool costs pennies and works without adding artificial fragrances to your modern kitchen space.
Coffee grounds and activated charcoal tricks
Used coffee grounds offer a brilliant zero-waste solution for tackling moderate fridge odours. Their porous, carbon-rich structure traps odour molecules rather than masking them, whilst leaving behind a pleasant coffee aroma.
Activated charcoal takes odour absorption to the next level with its massive surface area, making it particularly effective against stronger, persistent smells.
| Method | Best For | Application | Duration |
|---|---|---|---|
| Coffee grounds | Light to moderate odours | Place dried grounds in shallow dish | Replace weekly |
| Activated charcoal | Stubborn, intense smells | Use sachets or loose charcoal in container | Lasts 4-6 weeks |
Both methods work through adsorption – binding odour particles to their surfaces. Coffee grounds suit daily maintenance, while activated charcoal handles tougher jobs like post-spoilage cleanup.
Quick fixes for fishy and stubborn smells
When that fishy smell hits you the moment you open your fridge door, don’t panic – these targeted solutions work fast.
First step: Check your drip pan and coils at the back. Fishy odours often signal electrical issues, so unplug your fridge briefly and inspect for any unusual smells from the motor area.
Quick action fixes:
- White vinegar spray: Mix equal parts water and vinegar, spray surfaces, leave for 10 minutes
- Charcoal placement: Position activated charcoal briquettes in shallow bowls on multiple shelves
- Vanilla extract trick: Dab cotton balls with vanilla, place near strongest odour source
Top tips for stubborn smells: Keep the door open for 30 minutes after cleaning to let fresh air circulate. Replace any indicator tabs on your fridge’s air filters – they’re often forgotten culprits behind persistent odours.
These methods tackle the problem at source rather than masking it, giving you fresh results within hours.
How to get rid of smell after power outage
Power outages create the perfect storm for fridge odours – spoiled food, stagnant air, and bacterial growth all combine into one seriously unpleasant situation.
Immediate action steps:
- Remove everything, including spoiled items (freeze rotten food first to make disposal easier)
- Unplug the refrigerator and prop doors open for ventilation
- Clean thoroughly with baking soda paste, focusing on drip pan and hidden corners
Deodorizing timeline:
| Method | Application | Expected Results |
|---|---|---|
| Baking soda bowls | Multiple shallow dishes on each shelf | 24-48 hours |
| Activated charcoal | Loose pieces in containers | 2-3 days |
| White vinegar wipe-down | Equal parts water/vinegar solution | Immediate surface cleaning |
Leave your fridge unplugged with doors open overnight before restocking. The key difference with post-outage cleanup is patience – rushing back to normal use traps remaining odours inside.
Why does my fridge smell even after cleaning?
Sometimes the problem lies deeper than surface cleaning can reach. Plastic surfaces absorb odours over time, trapping smells even after thorough scrubbing.
Hidden culprits behind persistent odours:
| Problem Area | Why It Happens | Solution |
|---|---|---|
| Absorbed plastic odours | Porous materials trap smell molecules | Use vinegar solution, leave overnight |
| Blocked drain hole | Water buildup creates mould growth | Pour baking soda mixture down drain |
| Dirty condenser coils | Dust affects cooling, causes burning smell | Vacuum coils at back of fridge |
| Old water filter | Bacteria harbour in expired filters | Replace filter every 6 months |
Your fridge works hard to circulate air, which means lingering bacteria can spread throughout the system. We recommend checking these overlooked spots before assuming your cleaning wasn’t thorough enough.
Prevention tips to stop odours returning
Smart prevention beats reactive cleaning every time – and these simple habits keep your fridge smelling fresh without the drama.
Essential daily habits:
- Check dates weekly during your regular food shop to catch items before they spoil
- Wipe spills immediately rather than letting them set into surfaces
- Store leftovers in airtight containers to prevent cross-contamination of smells
- Keep strong-smelling foods sealed – cheese, fish, and onions need proper wrapping
Monthly maintenance routine:
- Replace your baking soda box every three months for maximum odour absorption
- Clean door seals with warm soapy water to prevent bacteria buildup
- Check your drip pan and give it a thorough wash
- Organize your fridge every week to keep a clear, fresh overview of what you have and avoid food waste.
The secret lies in creating barriers before problems start. Proper food storage stops odours spreading, whilst regular maintenance catches issues early.
When to call professionals or replace filters
Certain fridge odours signal problems beyond DIY fixes – recognising these red flags saves you time and prevents costly damage.
Professional help needed when:
- Chemical smells persist after thorough cleaning (potential refrigerant leak)
- Burning odours accompany unusual noises (electrical fault risk)
- Water filters haven’t been changed for over six months
- Inline filters located behind or underneath your fridge (requires specialised tools)
| Warning Sign | DIY Safe? | Professional Required |
|---|---|---|
| Persistent mould smell | ✗ | Deep system contamination |
| Electrical burning | ✗ | Safety hazard |
| Standard filter replacement | ✓ | Simple 6-month swap |
We’re talking safety here – chemical leaks and electrical faults need expert attention immediately. Your water filter replacement, however, is straightforward maintenance you can handle yourself every six months for optimal fresh air circulation.
How long does it take for smells to disappear?
Timing depends entirely on your chosen method and how stubborn those fridge smells have become.
Quick reference for odour removal:
| Method | Expected Timeline |
|---|---|
| Baking soda absorption | 24-72 hours |
| Vinegar wipe-down | Immediate surface results |
| Coffee grounds | 2-3 days for mild odours |
| Activated charcoal | 3-5 days for tough smells |
Factors affecting timing:
- Severity of contamination – spoiled food takes longer than simple spills
- Air circulation – leaving doors open speeds up the process
- Temperature – warmer conditions help natural deodorizers work faster
Most standard fridge odours clear within 48 hours using baking soda. Severe cases from power outages might need a full week with multiple methods combined.